








REQUIRED GEAR
A PC and an audio interface are essential
You do not need to know anything about sound — this page is written so a pastor or deacon can follow it alone: what to buy, where to plug it in, and what to check. Extra gear that depends on your screen setup is covered below.
These two you cannot do without
These two are enough for people to read captions on their own phones. Putting captions on the big screen comes after.
PC (laptop)
RequiredA modest one is fine. The interpretation happens on a server over the internet; the laptop only sends sound and shows captions. A few-years-old office laptop is enough — do not buy a new one.
Google Chrome
The sotonis console runs in Chrome. Nothing to install.
Internet
Wired ethernet is best. Steady matters more than fast. A phone hotspot also works.
Power adapter
It stays on for the whole service — keep it plugged in.
One thing — keep it separate from the slides laptop. Sharing one machine makes the slideshow and the caption window fight over the same display.
Audio interface
RequiredA palm-sized box that carries the mixer's sound into the laptop. It is the most important item on this page.
To interpret well, it first has to hear well
A person cannot follow a speaker who is too far away. A computer is no different: when the sound is unclear, it will get things wrong. Worse, an AI that did not catch the words does not stay quiet — it makes up something plausible. When captions say odd things, nine times out of ten the problem is the sound, not the interpretation.
So the best setup is simple: take the pastor's microphone straight off the mixer by cable (a line input). That is what the audio interface does.
Can't the laptop's own mic do it? — That mic hears the whole room. The air conditioner, coughs, a crying baby and the band all mix into the sermon, and it hears the pastor the way someone in the back row does.
$199approx.
Pro-studio standard · top-tier noise floor
Where to buy ↗How to use it — four steps
- 1
Take the sound from the mixer's phones out
Plug a cable into the mixer's headphone jack (PHONES). Not sure which socket? Compare with the pictures below, or send us a photo of the mixer.
- 2
Feed that sound into the audio interface
Plug the other end of the cable into input 1 on the front of the audio interface.
- 3
Connect the interface's USB to the PC
The included USB cable is all it takes. No power adapter, no software to install. The laptop recognizes it on its own.
- 4
Select the interface in the interpretation console
In the console, open the gear (Settings) › Audio › "Audio input" and pick the interface by name yourself. Then have someone speak into the mic and watch the "Input" meter. If it moves, you are done.
Plug the cable from the mixer into input 1 on the front.
Set the front switch to mono.
Connect the USB on the back to the PC.
Do not trust the computer's automatic choice
Usually it is picked up by itself. But only usually. After a Windows update, or on a day the USB went into a different port, the computer can silently fall back to the laptop's built-in mic. Then every cable is fine and the captions are still a mess.
- Every time, before you start — look at "Audio input" and see the interface's name there. Do not leave it on the default device; choose it by name.
- It cannot be changed once interpretation is running — the device only changes while stopped. So check before you press Start.
- The meter is the proof — if the Input meter moves when someone speaks into the mic and stops when that mic is pulled down on the mixer, the connection is right.
Which jack to look for on the mixer
Every mixer is different, so we cannot pre-pick your cable. But these three are practically all you will meet. Find the matching socket on the mixer and get a cable of that shape, 3 m or longer.
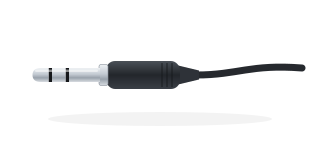
3.5mm (1/8″)
earphone-sized · small mixers
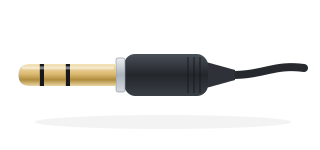
6.35mm (1/4″) TRS
mixer headphone jack · Aux sends
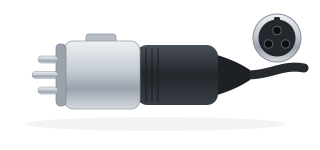
XLR
same shape as a mic cable · line outputs
No mixer, or not allowed to touch it? — Put one wireless mic in front of a loudspeaker and plug its receiver's output into the audio interface. Not as good as a direct line, but far better than the laptop's built-in mic.
The surest way — Photograph your mixer and send it to us. We will mark up the photo with exactly which socket and which cable. Ask before you buy.
Lay the captions over the picture you already show
With a single screen, the slides or the pastor's picture still have to stay up. So the laptop takes that picture in, lays captions along the bottom, and sends it back out (an overlay). That takes two more items.
Skip both of these if — you have two or more screens: hand one entirely to captions — it looks better and sets up faster. And if people will only read on their phones, you need no screen gear at all.
HDMI capture card
One screen onlyA small device that turns the picture headed for your screen (HDMI) into USB so the laptop can take it in. A laptop's HDMI port only sends; to receive a picture you need this.
When choosing — get one with an HDMI output (pass-through). It sends the incoming picture straight back out, and that cable feeds input A on the selector below.
HDMI A/B selector
One screen onlyA switch that sends one of two HDMI inputs to the screen at the press of a button. A is the original picture, untouched; B is the picture with captions.
Why you want it
Without it, the screen hangs on the interpretation laptop alone: if the laptop stalls, so does the screen. With a selector, one button takes you back to the old picture — the service never stops.
What to buy
One labelled "HDMI 2-in 1-out" with a manual button. Avoid auto-switching models — they change the picture on their own mid-service.
Three HDMI cables in all — card to selector, laptop to selector, selector to screen.
Hooking it up
- 1
Send the HDMI that fed the screen into the capture card
That is the cable from the slides computer or camera. The capture card's USB goes to the interpretation laptop.
- 2
Plug both pictures into the selector
A gets the capture card's HDMI output (pass-through — the original picture, untouched). B gets the interpretation laptop's HDMI output (the picture with captions). The selector's output goes to the screen.
- 3
Pick the capture card in the console
Settings › Video › "Video input": press Detect and choose the capture card from the list. When it says "Signal" and you see the picture, it is working. Do not assume — look.
- 4
Press Projection and set the selector to B
The screen now shows the original picture with captions on top. Drag the captions in the console to place and size them.
When to press A or B — B while interpreting. A for parts of the service without interpretation, or if the laptop has trouble. On A, the screen shows exactly what it showed before you had any of this.
This is the one part that is fiddly to do alone. Send photos of what is plugged in around your screen and we will set it up with you on a video call.
Nice to have
Handout earphones
OptionalFor members who would rather listen than read. Plug into a phone and the interpretation comes through as voice.
When to skip it — Most people bring their own — stock 20–30% of headcount, and mix in a few Lightning ones for older iPhones. Budget as if they will not come back, because they usually do not.
Set it up once; after that you only check
This is the first Sunday (allow thirty minutes). The device, gain, caption style and glossary you choose are saved to your account and this PC. After that you boot the laptop and check only "Audio input" and the Input meter.
- T-30 min
Boot the laptop and open the console in Google Chrome — the projection window only goes full screen there. Plug in the interface and (if used) the capture card.
- T-25
In Settings › Audio, confirm "Audio input" shows your interface, ask someone to speak, and watch the Input meter move (the same meter is on the left of the console's main screen). If it is quiet, raise the input gain.
- T-20
Press Projection — it opens full screen on the caption display. Then walk to the back row and check you can actually read it.
- T-15
Add today's names and terms to the glossary — the preacher's name, biblical names, ministry names. After clean sound, nothing moves quality more.
- T-10
Turn on the on-screen QR so people can join on their phones as they come in. No app needed.
- During service
Very little. Glance at the status line at the top of the console ("Server receiving · N phones/screens"). If something goes wrong it turns into a notice bar — press the button in it. Our team is alerted too. To tell us anything else, use "Notify our team" in Settings › General.
What if it breaks mid-service?
The moment everyone dreads. Save this page on your phone and open it when it happens.
No captions at all
First check whether the Input meter on the left of the console's main screen moves. Not moving? A cable is loose, the mixer's headphone volume is at zero, or "Audio input" is set to something other than your interface. Moving? Raise the input gain. If the console shows captions but phones don't, follow the notice bar at the top of the console.
Captions say things nobody said
Nine times out of ten it is the sound. First make sure "Audio input" has not fallen back to the laptop's built-in mic. If it is right, check whether the Input meter sits too low (raise the gain) or stays pinned at the top (lower the mixer volume).
Captions froze mid-service
A watchdog swaps the session on its own and it usually clears in seconds. If not, refresh the output window — phones stay connected.
Cannot find the output window
Make sure the display is in Extend mode (Windows: ⊞+P → Extend), drag the window over, then fullscreen it. In a single-screen room, also check the selector is on B.
And the important part — if interpretation stops, the service does not. Captions are a layer on top; the sermon and the music keep going regardless.
One photo of your mixer is enough
You do not have to know sound. Send photos of your mixer and around the screen, and we will mark up exactly what to buy and where it plugs in for your room. Ask before you buy anything.